Body and Roll Cage
FJ45 LWB pickup trucks are cool rigs. Projects
based on these vehicles have ranged from pure stock restorations to highly modified
conversions. Turning one of these rigs into a trail rig is not a simple task,
and the decision to do this must be based on an understanding of what is being
destroyed as well as what is being created. The off-road advantages of the longer
wheel base and the separate cab and pick-up bed/box are offset by the very design
of the box itself. It is an extremely long box and it has wide side panels with
very small wheel wells. The long overhang behind the rear axle is a real detriment
in the rocks, and the small wheel wells are incompatible with big tires. Consequently,
others who have built these trucks for off-road use have made dramatic changes
to the FJ45 box/bed. Modifications include replacing the entire box with a flat
bed (e.g., Gary Kardum or Henry Brimmer) or replacing both box and rear frame
with tubing (e.g., Jeremia Profitt). The challenge in making the truggy was
compounded by my desire to retain at least some resemblance to the original
pickup. This section describes how I attempted to build a hard-core off-road
rig while maintaining the essential features of the FJ45.
Cab
Of the twin FJ45 trucks, the '65 had the most damaged
cab and the '67 had the least desirable box. In building the truggy, I chose
to use the frame and box from the '67 and the cab from the '65. The '65 had
damage to the rocker panels below both doors and one corner of the cab was seriously
crumpled. The passenger's door sill was also damaged in three areas. Fortunately,
rust was minor and limited to the bottom of the floor in the rear corners of
the cab. I solved the problem with the rocker panels by cutting them off 3"
above the original bottom. This cut was made just below the bottom of the floor
and extended from the front of the cab below the fenders to the body mount at
each rear corner.
In an effort to keep the center of gravity low,
I did not want to lift the body. With the driveline located high in the frame,
the gear boxes hit the cab floor, especially beneath the passenger's seat where
the floor is lowered to provide room for the under-the-seat gas tank. I had
to cut out then entire dropped portion of the floor on the passenger's side
and replace that with a flat piece of 16 gauge steel.
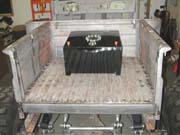 The
bulk of the body work focused on the bed. I addressd the disadvantages listed
above by dramatically reducing the size of the box. The outside dimension of
the stock LWB box is 86" in length and 65" wide. I cut the box down
to one that measures 42" x 42". The greatly reduced length places
the rear of the box in front of the rear of the tires, thus creating a great
departure angle. The new width places the outside of the box just outside the
frame and well inside of the tires. By performing this surgery on the box, I
was able to completely eliminate the stock wheel wells. In fact, this goal dictated
where to cut the OEM box -- it was narrowed by an amount on each side necessary
to remove the wheel wells and shortened by cutting out the side panels that
contained the wells. Prior to reassembly, the bed was in 12 different pieces!THe
bed holds a 15 gallon aluminum fuel cell and has just a bit of space left over
for the ice chest.
The
bulk of the body work focused on the bed. I addressd the disadvantages listed
above by dramatically reducing the size of the box. The outside dimension of
the stock LWB box is 86" in length and 65" wide. I cut the box down
to one that measures 42" x 42". The greatly reduced length places
the rear of the box in front of the rear of the tires, thus creating a great
departure angle. The new width places the outside of the box just outside the
frame and well inside of the tires. By performing this surgery on the box, I
was able to completely eliminate the stock wheel wells. In fact, this goal dictated
where to cut the OEM box -- it was narrowed by an amount on each side necessary
to remove the wheel wells and shortened by cutting out the side panels that
contained the wells. Prior to reassembly, the bed was in 12 different pieces!THe
bed holds a 15 gallon aluminum fuel cell and has just a bit of space left over
for the ice chest.
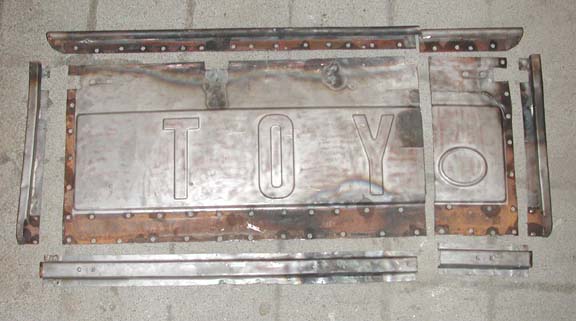
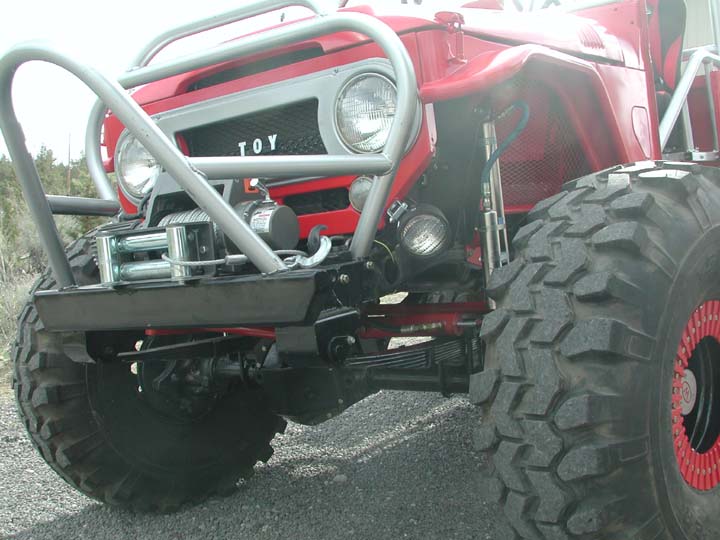
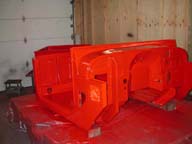
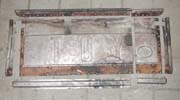 Narrowing
of the box also allowed me to make a special tailgate. The original tailgate
had been badly damaged and was both bent and warped. These tailgates are near
unobtanium today, and I had to either make a complete replacement of somehow
salvage the damaged one. Fortunately, I was able to cut out the most damaged
section, and remarkably, the remaining tailgate sections and the width of the
narrowed box combined to place the raised letters "TOY" squarely in
the middle of the modified tailgate. Unfortuantely, this was not an easy job.
In order to get the tailgate flat, I had to cut out all spot welds holding the
various panels together (there were 62 of these welds). The image to the right
shows the tailgate with all eight panels separated. By cutting the welds and
separating the various panels, I was able to straighten each of the panels independently.
When I welded the panels back together, I ended up with a straight tailgate.
Since I will not be using this as a work truck and with the fuel cell in the
box, there is no reason to have a functional tailgate. I therefore chose to
weld the tailgate to the box rather than deal with hinges and latch mechanisms.
Narrowing
of the box also allowed me to make a special tailgate. The original tailgate
had been badly damaged and was both bent and warped. These tailgates are near
unobtanium today, and I had to either make a complete replacement of somehow
salvage the damaged one. Fortunately, I was able to cut out the most damaged
section, and remarkably, the remaining tailgate sections and the width of the
narrowed box combined to place the raised letters "TOY" squarely in
the middle of the modified tailgate. Unfortuantely, this was not an easy job.
In order to get the tailgate flat, I had to cut out all spot welds holding the
various panels together (there were 62 of these welds). The image to the right
shows the tailgate with all eight panels separated. By cutting the welds and
separating the various panels, I was able to straighten each of the panels independently.
When I welded the panels back together, I ended up with a straight tailgate.
Since I will not be using this as a work truck and with the fuel cell in the
box, there is no reason to have a functional tailgate. I therefore chose to
weld the tailgate to the box rather than deal with hinges and latch mechanisms.
I will post final pictures after the Truggy has
been painted.
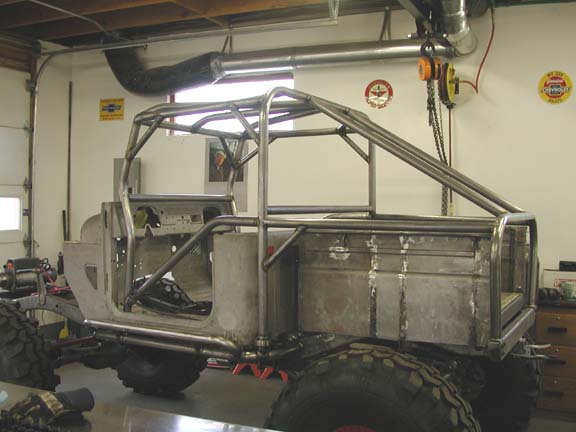
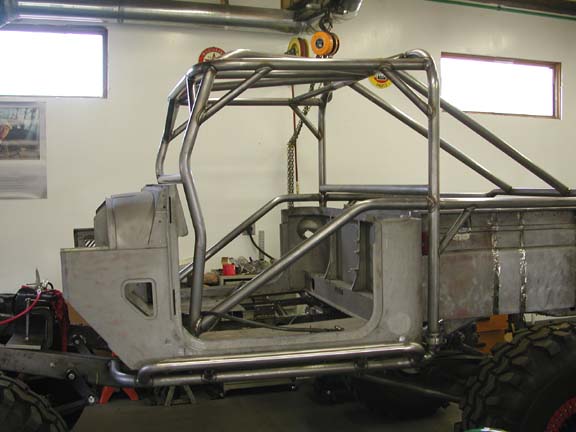
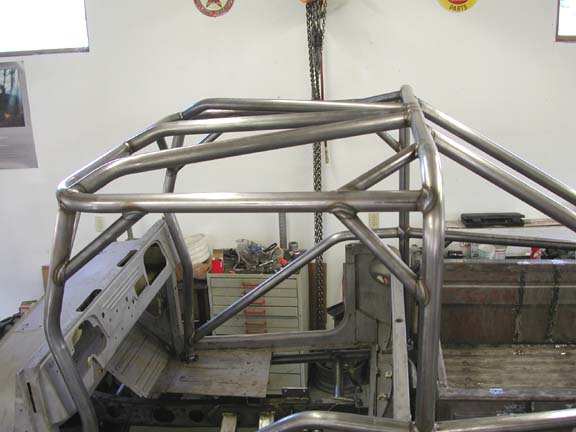
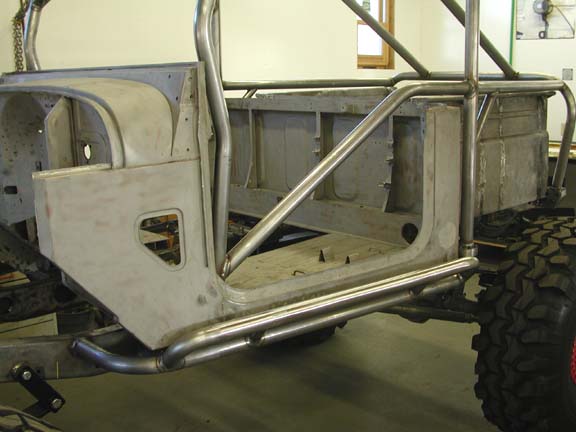
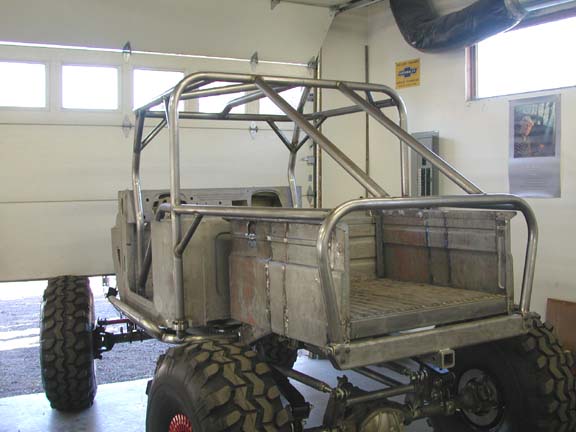
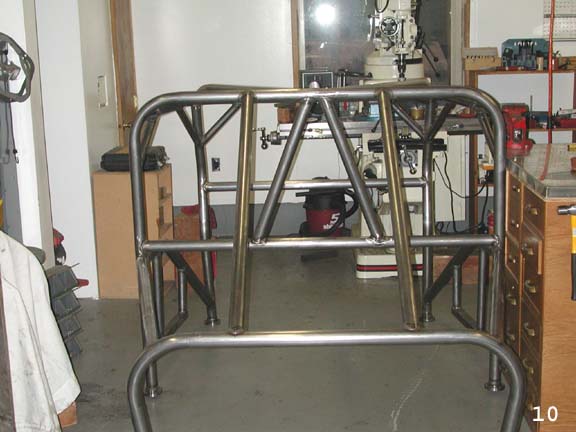
Cage
Thumbnails of the Truggy's roll cage are shown on the left.
The cage was fabricated with approximately 140' of 2" o.d. and 20' of 1.5"
o.d. HREW tubing with a 0.120" wall thickness. The
main hoops and spreader bars are 2" and the gussets are 1.5" tubing.
I designed the cage, but the real credit for it goes to Dave Custer of Alchemy
Metalwerks in Bend, OR. Dave has a Pro Tools hydraulic tube bender and he expertly
made the bends and put together the cage. The 2" tube bends were made using
7" radius dies. The two of us working together built the cage and slider
bars over a period of three days. NOTE: Most of these pics show the cage in
various stages of completion (i.e., some do not show all the spreader bars or
seat hangers). Image # 10 shows the final cage configuration.
 I
wanted the cage to be tied firmly to the frame rather than simply bolted to
the body as is often done. However, I also wanted to be able to remove the cage
in order to complete the body work, to be able to repair it or the body/tub
at some later date, or if I chose to put the top on at some point down the road.
I
wanted the cage to be tied firmly to the frame rather than simply bolted to
the body as is often done. However, I also wanted to be able to remove the cage
in order to complete the body work, to be able to repair it or the body/tub
at some later date, or if I chose to put the top on at some point down the road.
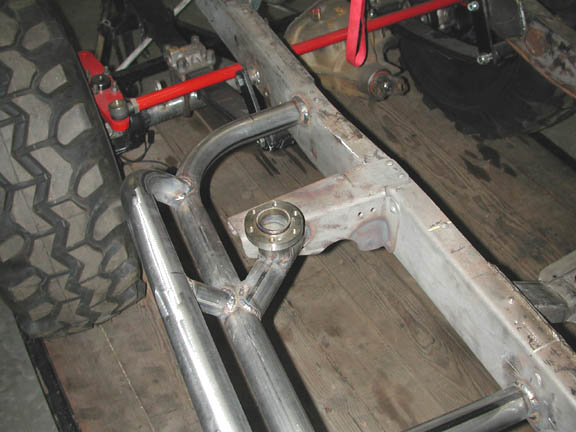
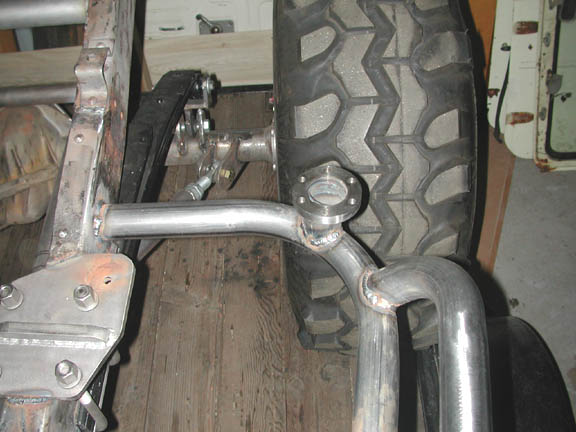
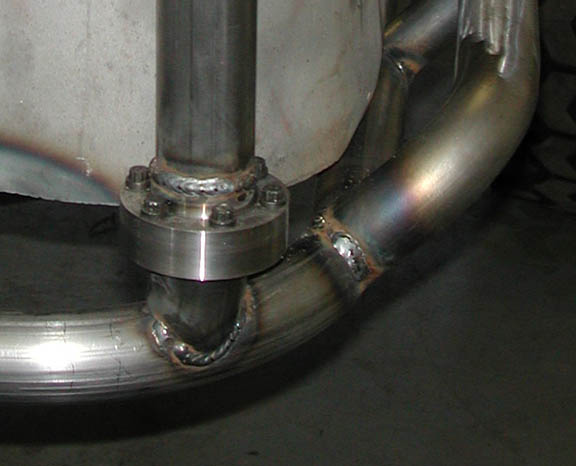
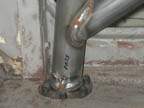
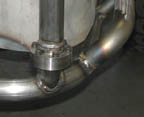 I
met these two goals by fabricating custom flanges that mate a lower portion
of cage tube that is welded to the frame with an upper portion that can be unbolted
from the flange base. The image to the above right shows one of the two flanges
for the front hoop, and the image to the immediate right shows one of the two
flanges for the main hoop. The flanges for the front hoop sit flush with the
cab floor while those for the main hoop rise above the main slider tube. I machined
the flanges on my lathe from 4.5" o.d. steel tube with a 0.750 wall thickness.
Each flange consists of two parts: a lower segment that is 0.500" thick
and an upper piece that is 1" thick but has a .500" thick 0.125"
o.d. riser in the center. For the lower halves, I drilled and tapped six 0.375"
diameter, NFT holes spaced 60 degrees around the flange (I used a dividing head
on my milling machine for this). The lower halves are welded to tube running
to the frame as shown in figures 8 and 9. The upper halves bolt onto the lowers
with six 0.375 NFT, grade 8, 12-point bolts. The rear hoop bolts to the rear
bumper. Figure 10 shows the complete cage removed from the Truggy.
I
met these two goals by fabricating custom flanges that mate a lower portion
of cage tube that is welded to the frame with an upper portion that can be unbolted
from the flange base. The image to the above right shows one of the two flanges
for the front hoop, and the image to the immediate right shows one of the two
flanges for the main hoop. The flanges for the front hoop sit flush with the
cab floor while those for the main hoop rise above the main slider tube. I machined
the flanges on my lathe from 4.5" o.d. steel tube with a 0.750 wall thickness.
Each flange consists of two parts: a lower segment that is 0.500" thick
and an upper piece that is 1" thick but has a .500" thick 0.125"
o.d. riser in the center. For the lower halves, I drilled and tapped six 0.375"
diameter, NFT holes spaced 60 degrees around the flange (I used a dividing head
on my milling machine for this). The lower halves are welded to tube running
to the frame as shown in figures 8 and 9. The upper halves bolt onto the lowers
with six 0.375 NFT, grade 8, 12-point bolts. The rear hoop bolts to the rear
bumper. Figure 10 shows the complete cage removed from the Truggy.
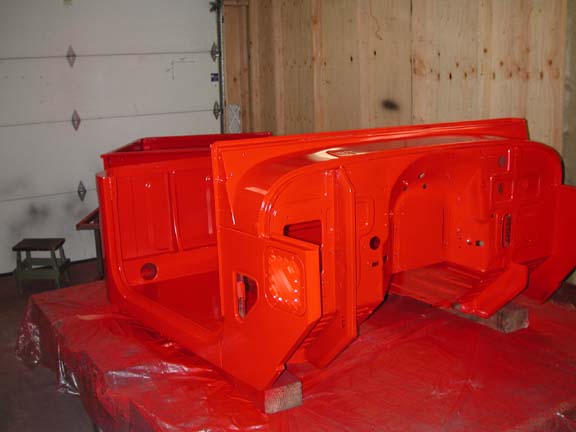
Paint
As shown in the images above, all of the body parts
were sandblasted in order to remove all of the original paint and primer.Although
clearly on the red-neck side, I build a small paint booth in my SHOP
that lets me paint in a somewhat controlled and clean environment. I use an
HVLP turbine compressor (5 psi!) that reduces overspray and heats the air prior
to being sprayed.
 Following
cleaning, all parts were primed with PPG DP90 primer. This is a two-part, self-etching
epoxy primer. It sprays very nicely and is exceptionally tough. The paint is
PPG Delstar acrylic enamel, which is also a two-part (catalyzed) paint. The
color of the paint usd for the body is technically called Peacock Red, but it
is commonly referred to as Dodge Viper Red. The cage, bezel and other trim pieces
are also painted with Delstar acrylic enamel, but in a metallic silver color.
Since this is a trail rig, I did not go to the effort to put on a clear coat,
just three or four thin coats of the acrylic enamel.
Following
cleaning, all parts were primed with PPG DP90 primer. This is a two-part, self-etching
epoxy primer. It sprays very nicely and is exceptionally tough. The paint is
PPG Delstar acrylic enamel, which is also a two-part (catalyzed) paint. The
color of the paint usd for the body is technically called Peacock Red, but it
is commonly referred to as Dodge Viper Red. The cage, bezel and other trim pieces
are also painted with Delstar acrylic enamel, but in a metallic silver color.
Since this is a trail rig, I did not go to the effort to put on a clear coat,
just three or four thin coats of the acrylic enamel.
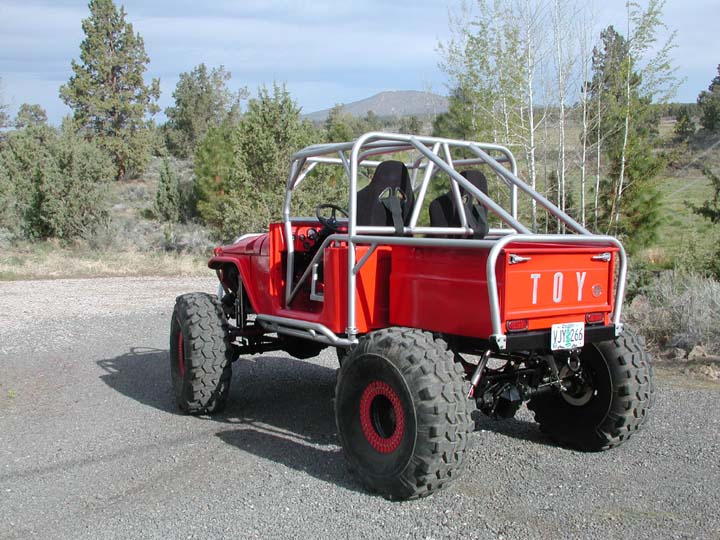
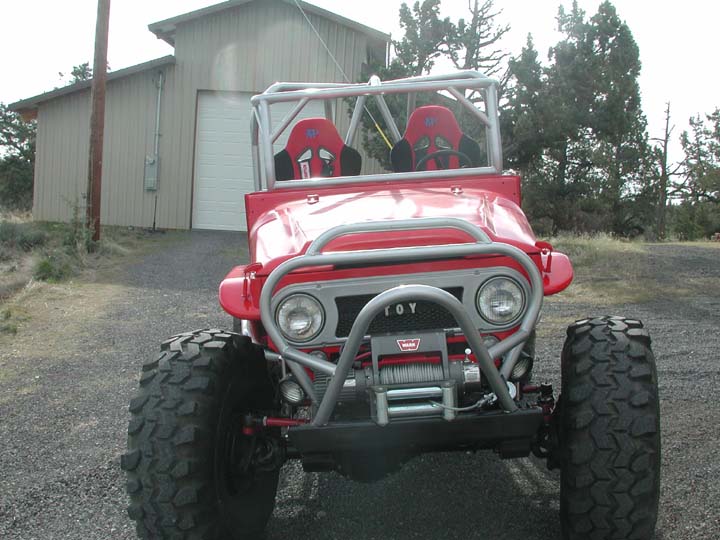
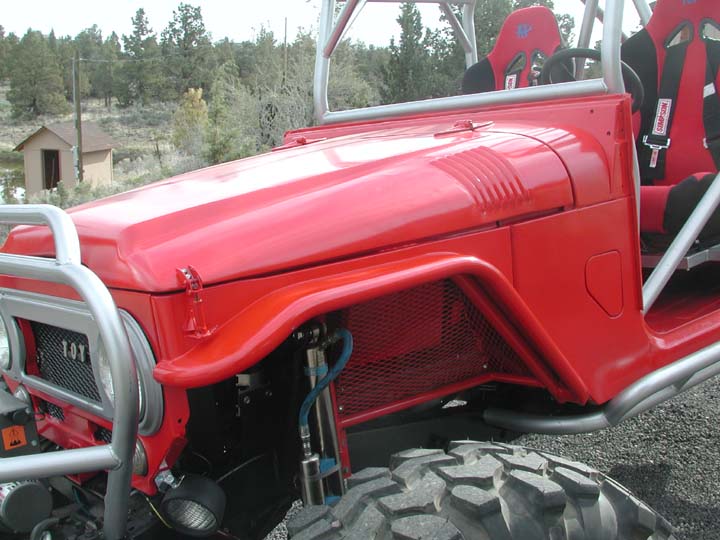
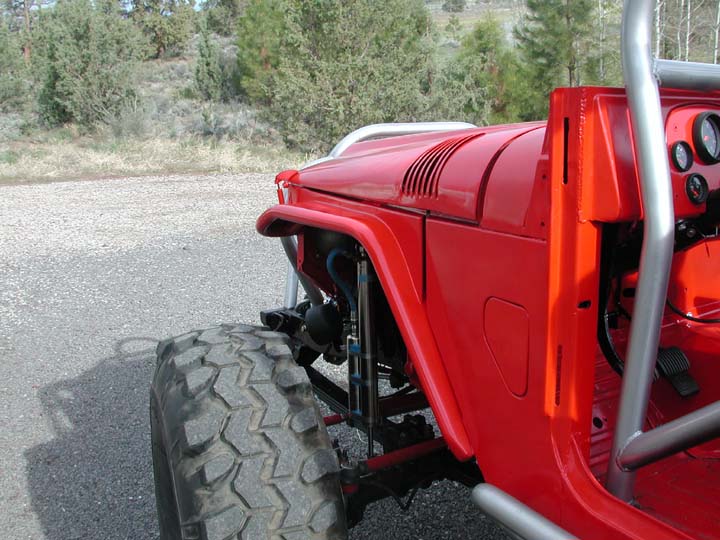
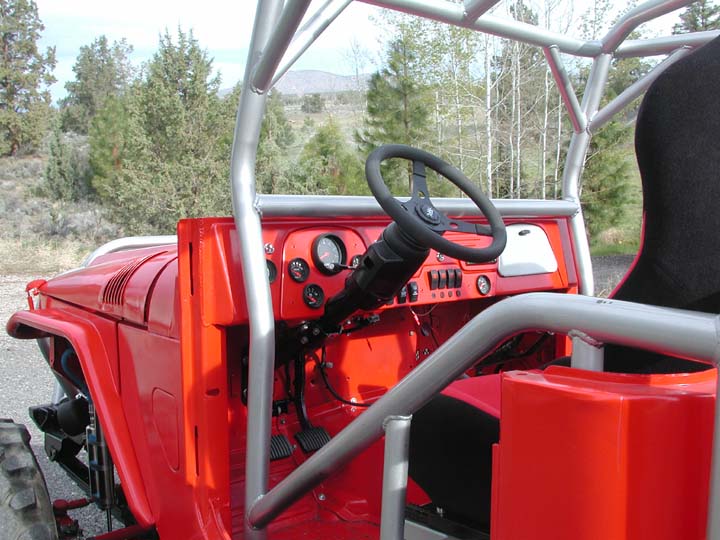
Some additional pictures of the finished product
are shown below.
 The
bulk of the body work focused on the bed. I addressd the disadvantages listed
above by dramatically reducing the size of the box. The outside dimension of
the stock LWB box is 86" in length and 65" wide. I cut the box down
to one that measures 42" x 42". The greatly reduced length places
the rear of the box in front of the rear of the tires, thus creating a great
departure angle. The new width places the outside of the box just outside the
frame and well inside of the tires. By performing this surgery on the box, I
was able to completely eliminate the stock wheel wells. In fact, this goal dictated
where to cut the OEM box -- it was narrowed by an amount on each side necessary
to remove the wheel wells and shortened by cutting out the side panels that
contained the wells. Prior to reassembly, the bed was in 12 different pieces!THe
bed holds a 15 gallon aluminum fuel cell and has just a bit of space left over
for the ice chest.
The
bulk of the body work focused on the bed. I addressd the disadvantages listed
above by dramatically reducing the size of the box. The outside dimension of
the stock LWB box is 86" in length and 65" wide. I cut the box down
to one that measures 42" x 42". The greatly reduced length places
the rear of the box in front of the rear of the tires, thus creating a great
departure angle. The new width places the outside of the box just outside the
frame and well inside of the tires. By performing this surgery on the box, I
was able to completely eliminate the stock wheel wells. In fact, this goal dictated
where to cut the OEM box -- it was narrowed by an amount on each side necessary
to remove the wheel wells and shortened by cutting out the side panels that
contained the wells. Prior to reassembly, the bed was in 12 different pieces!THe
bed holds a 15 gallon aluminum fuel cell and has just a bit of space left over
for the ice chest.